It’s been a minute! But I’m finally going to move forward with the quilt block series. Apologies for such a lengthy delay – I’ve had so many things to get on top of it’s just been pushed to the backburner one too many times. This one still uses the simple squares, retangles and HST’s we’ve already used, but it comes together in a different way and forms a lovely flower. As with the previous posts, I’m using the textured blenders. This is in the hope that once we get to the end, we can put them all together into one finished quilt.
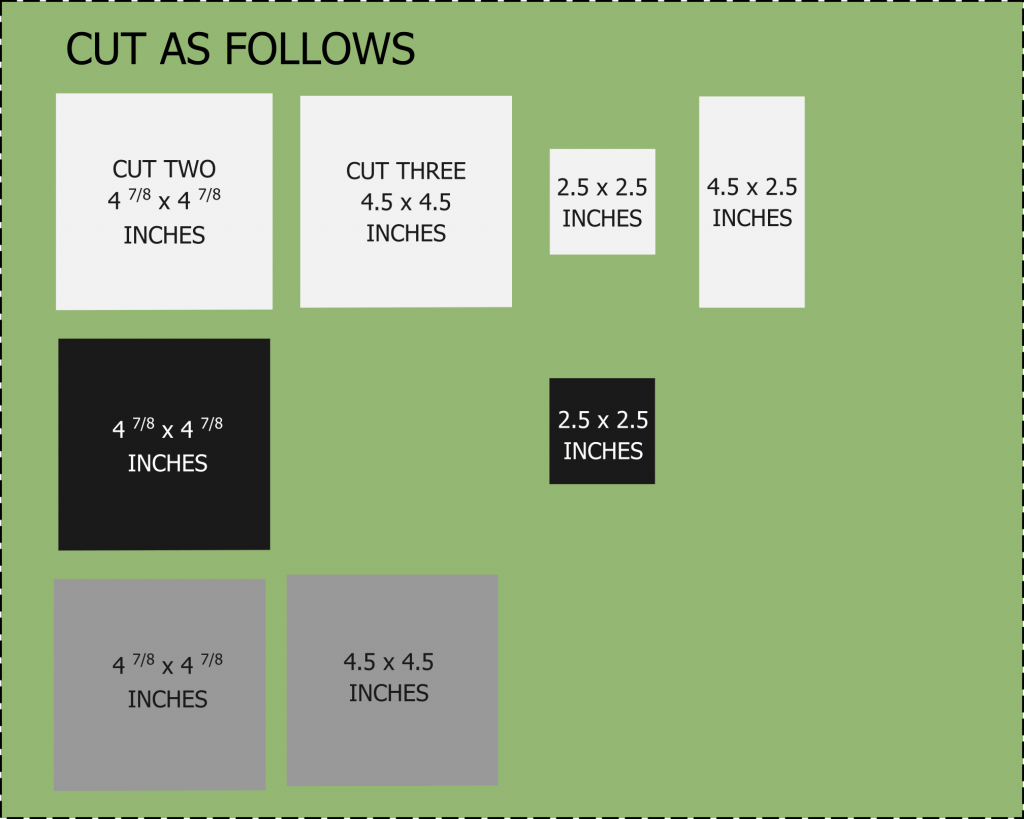
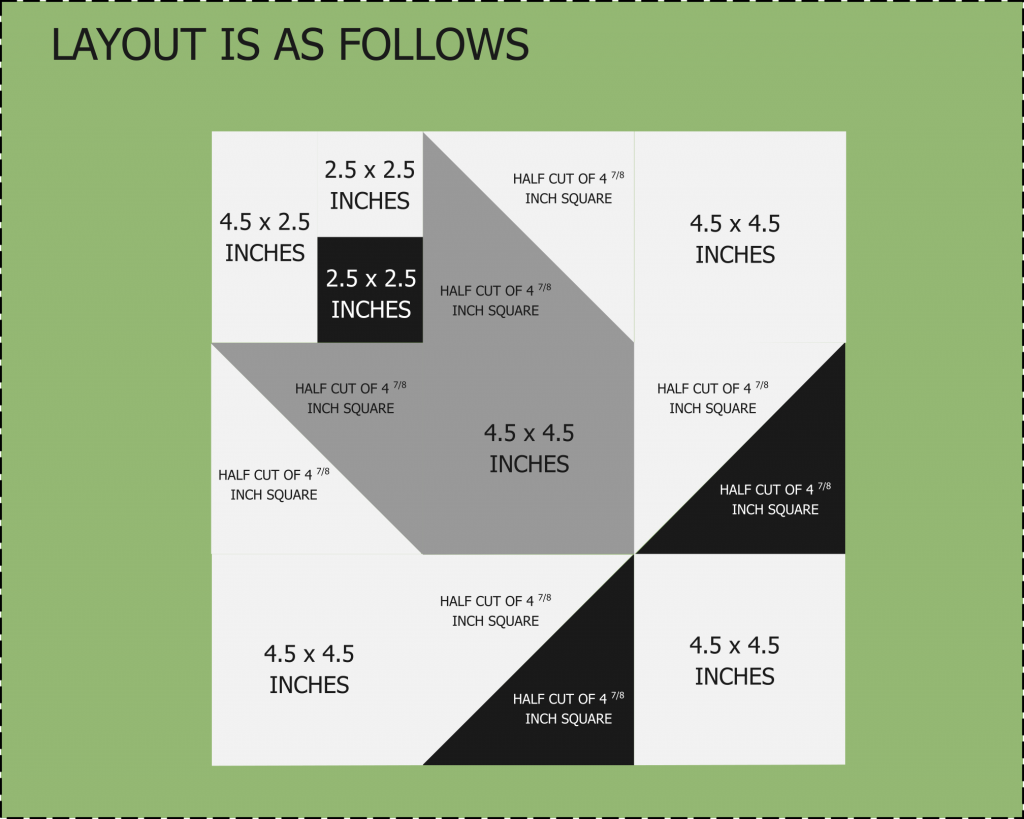
The fabric cuts are as follows, and I’m adding images rather than a list as I think this will make it clearer for this particular one. If you struggle to work out 7/8ths – scroll down a little for a helpful visual.
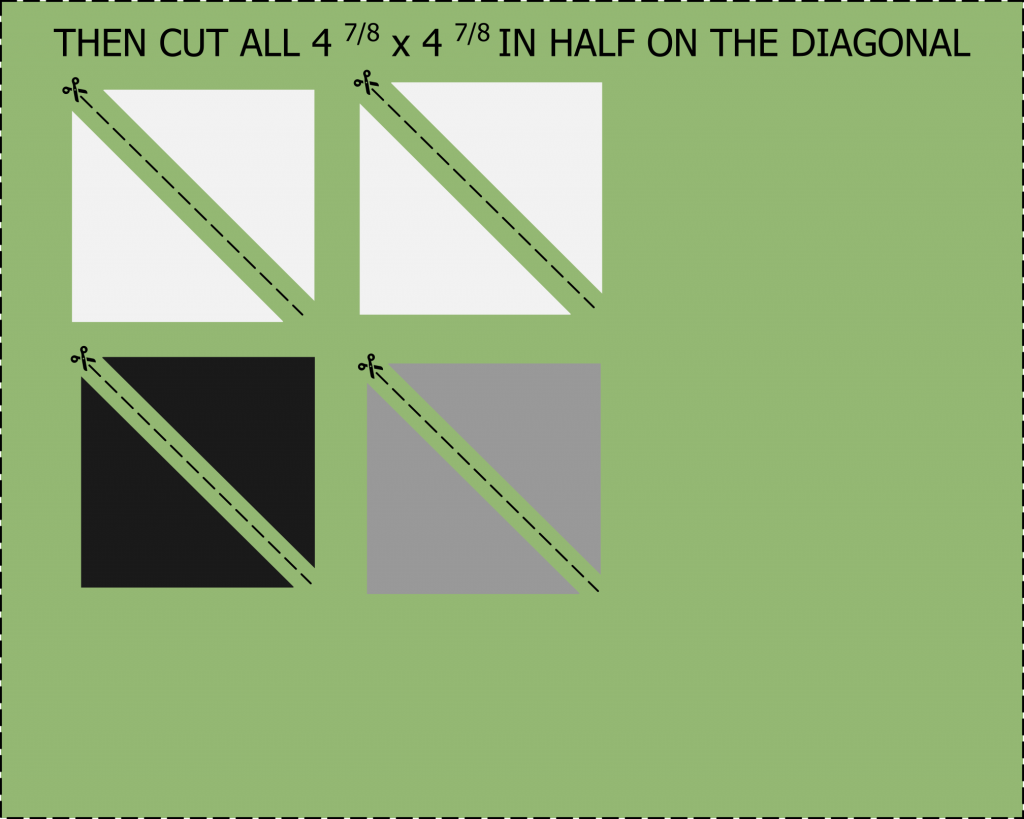
Now you’ve made those cuts, there is an additional cut that’s required. All the 4 and 7/8th patches need to be cut on the diagonal to form a series of triangles as follows:
You’ll then be able to lay out the patches as they’ll be sewn together, making it much easier to visualise the finished block:
So, with that out of the way – sit back and enjoy the video on Youtube and if you have any questions, please feel free to ask. I am posting the Youtube transcript below incase someone from another country wishes to translate.
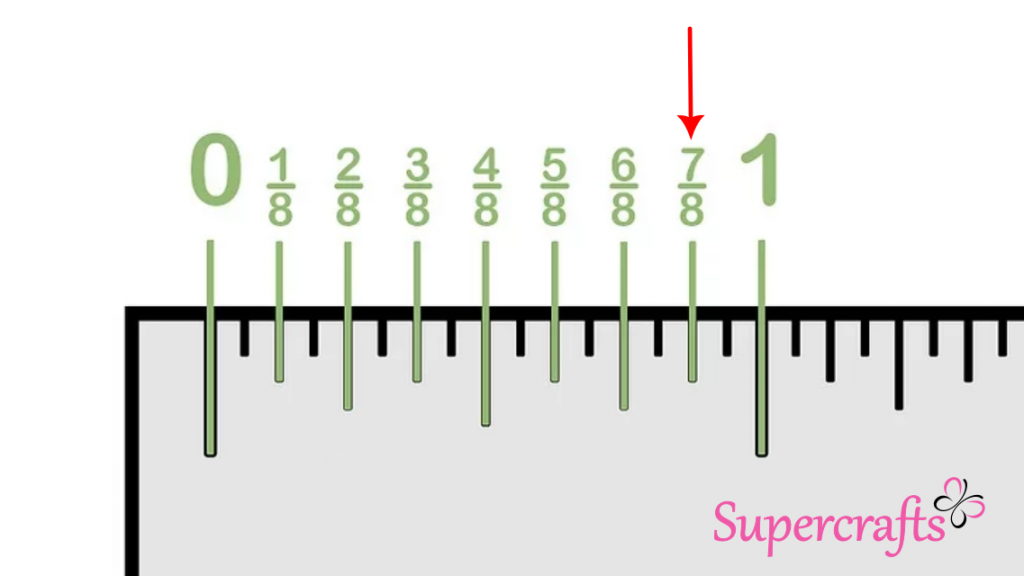
Oh! One more thing as it seems to trip some people up… working out 7/8ths on a ruler! Here’s a quick image that should explain it properly.
Youtube Transcript
Hi everyone. This week we’re going to finally move forward with the quilt block series! It’s been a while, I know. I’ve a list of projects longer than my arm to get to and this one has been put off so many times! This one is a little different. Whilst it still maintains the easy to work with squares, rectangles and half square triangles, when put together it creates a wonderful flower block. You’ll need 3 fabrics for this one and really think about the fabrics as the background needs to be lighter than the flower, bud and leaves in order for it to really pop.
I’m using textured blenders in white, black and grey.
You need the following cuts from those fabrics:
From white, you need three 4.5” squares, one 2.5 inch square, a 4.5 x 2.5 inch rectangle and two 4 and 7/8ths inch squares, which you then need to cut on the diagonal. All of the largest squares need cutting on the diagonal.
From the grey, you need one 4.5 inch square and one 4 and 7/8ths square.
And finally, from the black, you need one 2.5 inch square and one 4 and 7/8ths square, cut n the diagonal.
I’ll add a link to the blog post where I’ll add an image that makes the cuts clearer. And for those who have no clue what 7/8ths of an inch looks like here’s an image…
So before we start construction, we need to cut those larger squares in half across the diagonal. You can mark the line then cut it, or simply place your ruler from one corner to the other and run your rotary cutter down it. Do this for all the 4 and 7/8th inch squares. You’ll be left with 2 black triangles, 2 grey triangles and 4 white triangles.
Now they’re cut. Lay out all your pieces. Again, I’ll add an image tot he blog s you can see quickly where things go. Doing this will allow you to see how it should come together. This will also show that you’ve made all the cuts correctly before you start sewing them together. Let’s speed up a little…
We’re going to create the bud section first. I need to move all the others to make room… So take the 2.5 inch squares of white and black fabric and the 4.5 by 2.5 inch rectangle and the 2.5 inch black square.
So remember the black bud section needs to be at the bottom of the two 2.5 inch squares. Flip the top white patch over on top of the black patch with the right sides facing one another. Then sew across that top edge using a ¼ inch seam allowance. All seams are quarter inch in this block.
Press to set the seam, then press that seam open. I’ve gone and put all the other patches on the ironing mat like an idiot, so I’ll finger press for now.
With the black square at the bottom and your rectangle on the left, flip the 2.5inch squares on top of the rectangle right sides together and sew down the right hand side.
That’s the bud section complete, so set that aside and we’ll move on to patch two for row one.
Take a grey triangle and a white one. Place them right sides together and sew down the longest edge. You can pin them together if you want to. Press the seam open… I’ll stop saying that, but just assume unless I say different, that all these seams are to be pressed open.
The third patch of row one is a simple white patch, so nothing to prepare here.
That’s row one done, we’ll move to row two.
So the first patch in row two is another grey and white patch, made in exactly the same way as the previous one.
The second patch in row two needs no prep.
The third patch in row two is a white triangle and a black triangle. As with the others, right sides together and sew down the longest edge. Then press open as before.
Row three begins with a full patch, no prep needed, then we complete another white and black patch, followed by another full patch. The final row is so simple!
That’s all the individual patches created, now we can put them all together. But before I do that, because the ironing mat is now cleared off, I’m going to give all these a quick press I’ll run this forward because… hopefully… you ironed the seams as you were working.
We’re first going to put together the three rows. Lay out your first row of patches, then flip the middle patch over onto the first patch so the right sides are facing.
Sew down that right hand side.
Repeat with the final patch.
Then press both seams open and give it a press from the top too.
Now repeat this for the other two rows.
We need to sew the three rows together now, so we’re going to align the bottom of row one with the top of row two by flipping row one down on top of row two. Before sewing, pop a pin through the two seams to ensure they align correctly for each row. The fabrics need to be right sides together again.
Sew using a ¼ inch allowance as before. Being sure to remove your pins, please never ever ever sew over a pin!
Press to set the seam, then press the seam upwards.
As I was about to get to the final row, my camera stopped recording. Because, well, of course it did! I did spot it and set it recording again, but somehow made a settings change in the process which means the video it created won’t play. It’s basically put together in the same way as the previous rows, so align the seams that run down between the patches, pop in a couple of pins, sew… and this time press the seam downwards.
Give the block a nice run over with an iron and admire your work! This one would be lovely in summery colours with different colours for the buds and petals!
Thanks for watching, and if you haven’t already, please consider liking this video and subscribing to our channel!
Until next time, Happy Sewing!
Youtube Video