This project shows you how to create a lovely little apron suitable for lots of different uses. Use it in the kitchen, in the garden, whilst cleaning etc. I whipped one up for the office so pens and other use-all-the-time items are to hand when needed, then made another using the newly added “Fabulously Fruity” fabric bundle, just because 😉
What You’ll Need:
Apron body – one rectangle 16 inches by 20 inches
Back pocket – one rectangle 16 inches by 16 inches
Front pocket – one rectangle 16 inches by 11 inches
Sash – one strip 16 inches by 5 inches and two strips 20 inches by 5 inches (I used the Fabulously fruity fabric bundle available here).
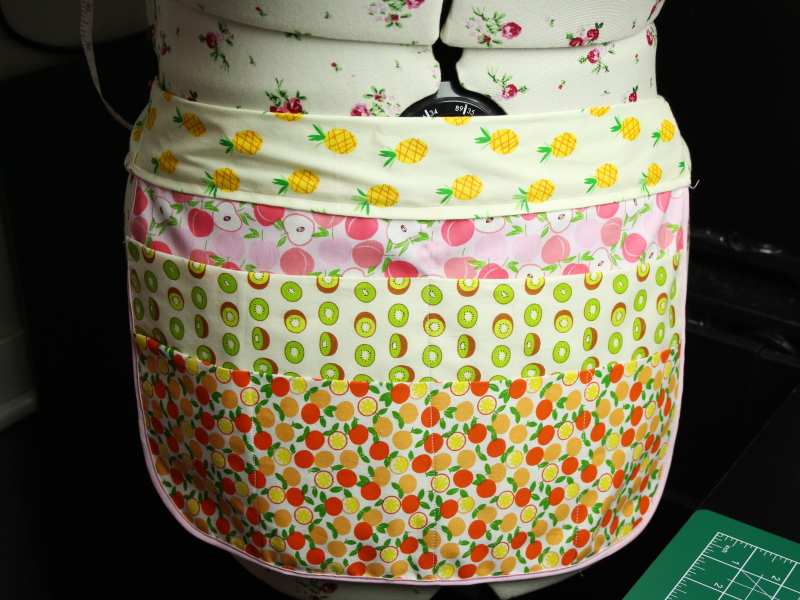
First gather all of the materials listed above.If you have the material but haven’t cut it to size, do so now. You will need to cut the following: From the body material, cut one 16 x 20 inch rectangles. From the sash material, cut one 16 x 5 inch strip. From the sash material, cut two 20 x 5 inch strips. From the back pocket material, cut one 16 x 16 rectangle. From the front pocket material, cut one 16 x 11 inch rectangle. You should be left with 7 cut pieces as shown above.To create the pocket pieces take each piece and fold it in half along it’s longest side. Wrong sides should be facing. Press these.Whilst the iron is out – go ahead and fold the sash pieces in half along their longest side and press these too.Now place your body piece on a flat surface right side up. Add the back and front pockets so all your pieces are stacked neatly together (butted up at the bottom).Now take a small bowl, large mug or anything else you have to hand that will create a nice rounded edge and place it on the bottom corners of the pile of fabric and mark using an air soluble marker.Using a rotary cutter, cut the fabric to create rounded corners on the apron. This is completely optional, but the finished product looks so much better.To create the front pockets, lift off the top two pocket pieces and lay them together right side facing up.Sew 4 inches in from the edge on either side. Sew from the top of the front pocket to the bottom. This creates the smaller pockets.Now lay the pocket piece on top of the body piece, being sure to line up the rounded corners (centre is around 8 inches in). Sew down the centre from top to bottom to create more pockets.Baste around the sides and bottom to keep the fabric together using a large stitch. I used 5.Now attach the binding. Fold your binding in half lengthways and place your fabric pieces between the fold. Pin the binding in place.Stitch using a smaller stitch. we use 2.5. Stitch all the binding in place.If you didn’t do this previously, to create the sash, fold all the pieces in half across their longest side and press them. This will make them easier to work with and also create a lovely straight top piece. The eagle eyed amongst you will notice I managed to cut the centre piece too wide – I’ve no idea how I managed this but as luck would have it, that piece is hidden inside the sash in the end so it wasn’t an issue).Open one of the shorter pieces and the longer piece and sew them together at one of the short ends. Do the same for the opposite side of the longer piece with the second of your shorter pieces so that all three are now sewn together.Fold the sash in half right sides together and stitch the two outer pieces on their longer edge.Mark the ends of the [now ]one piece at an angle. The two should be marked at opposite angles as seen here.Sew the two ends where you just marked them and trim off the excess fabric. You don’t need to use pinking shears, regular scissors will do. I like to use pinking shears to avoid the fabric fraying.Now turn the fabric the correct way out. See how I forgot to reinforce the first and last stitch with a backstitch? 🙁 If you forgot (which I’m sure you didn’t!), carefully resew this seam before turning it out.Give the ends a poke with a chopstick or turner. Press the fabric, being sure to turn the middle section in and press the raw edges to the inside of the fabric so they won’t be seen.Lay the sash and body on a flat surface and carefully place the body inside the sash opening.Pin this in place.Stitch across the top of the middle section to attach the two together. As these stitches will be seen, make sure you choose a thread that looks nice on your fabric. Use a smaller stitch for this top-stitching (I used number 3).
Now give the whole thing a press and…
Voila! You have your very own homemade nifty little apron!